Raspberry Pi setup
Raspberry Pi setup
Pre-requisites:
- Raspberry Pi
- A Domain
Boot Raspberry Pi OS
-
Connect a SD card with card reader at windows/ ubuntu pc
-
Update your pi
sudo apt update && sudo apt upgrade -y -
Assign static IP to your pi
-
via Pi config (if router doesn’t support DHCP reservation):
sudo nano /etc/dhcpcd.conf -
Add:
interface eth0 # or wlan0 if WiFi static ip_address=192.168.1.50/24 static routers=192.168.1.1 static domain_name_servers=1.1.1.1 8.8.8.8 -
Save → reboot:
sudo reboot
Installation of Pi-hole
- Update system:
sudo apt update && sudo apt upgrade -y- Run Pi-hole installer:
curl -sSL https://install.pi-hole.net | bash-
During install:
- Choose the network interface (
eth0orwlan0). - Use the static IP you set.
- Choose an upstream DNS (Cloudflare
1.1.1.1recommended). - Enable web admin.
- Choose the network interface (
-
At the end, you’ll get:
- Admin URL:
http://192.168.1.50/admin - Auto-generated web password (copy this).
- Admin URL:
✅ Enable Pi-hole API
- Log into web interface → Settings → API / Web Interface.
- Enable API.
- Copy your API Token — you’ll use this later with Cloudflare Tunnel + Dokploy/Render.
✅ At this point you have a
working Pi-hole running locally.
From here, we’ll extend it with
Cloudflare Tunnel
so you can programmatically update allow/block lists from your VPS/Dokploy/Render without worrying about dynamic IP.
Get the Pi-hole’s access at public internet (through Cloudflare tunnel)
🔹 Step 1: Download the latest cloudflared
Check your Pi’s architecture first:
uname -m- If it says
aarch64→ you need the arm64 package. - If it says
armv7l→ you need the armhf package.
Now download the correct .deb:
# For 64-bit Pi OS (arm64)
wget https://github.com/cloudflare/cloudflared/releases/latest/download/cloudflared-linux-arm64.deb

# For 32-bit Pi OS (armhf)
wget https://github.com/cloudflare/cloudflared/releases/latest/download/cloudflared-linux-armhf.deb
🔹 Step 2: Install it
sudo dpkg -i cloudflared-linux-*.debIf it complains about missing dependencies, run:
sudo apt-get -f install -y🔹 Step 3: Verify installation
cloudflared --versionYou should see the installed version.
👉 After this, you can continue with:
cloudflared tunnel loginto authenticate with Cloudflare and create your tunnel.
⚡ Bonus: If you just want a quick test without a Cloudflare account/domain, you can run:
cloudflared tunnel --url http://localhost:80It will give you a temporary https://something.trycloudflare.com URL that exposes your Pi-hole dashboard securely to the internet.
🔹 Step 4: create a persistent tunnel that exposes Pi-hole’s admin/API over HTTPS
Now we’ll create a persistent tunnel that exposes Pi-hole’s admin/API over HTTPS (either on a subdomain you own, or via a temporary trycloudflare.com URL), configure ingress so only /admin (and the API) is exposed, and install the tunnel as a service so it auto-starts.
I’ll give two clear paths (pick one): A. Permanent tunnel with your Cloudflare domain (recommended) and B. Quick temporary trycloudflare.com test. Both assume Pi-hole’s web UI is reachable locally at http://localhost/admin (Pi-hole uses lighttpd on port 80 by default).
A — Permanent tunnel (use your Cloudflare domain)
Use this if you control a Cloudflare domain (example: yourdomain.com) and want a stable subdomain like pihole.yourdomain.com.
- Create the named tunnel
# run on the Pi (you already logged in)
cloudflared tunnel create pihole-tunnel
This prints a tunnel ID and places credentials in ~/.cloudflared/<tunnel-id>.json.
-
Create the cloudflared config
Create
~/.cloudflared/config.ymlwith content (replace placeholders):
nano ~/.cloudflared/config.ymltunnel: TUNNEL_ID_FROM_CREATE
credentials-file: /home/hasan/.cloudflared/TUNNEL_ID.json
ingress:
- hostname: pihole.yourdomain.com
service: http://localhost/admin
# optional: allow direct API endpoints (admin/api.php) explicitly
- hostname: pihole.yourdomain.com
service: http://localhost/admin/api.php
# default rule for everything else
- service: http_status:404- Create DNS record in Cloudflare pointing the hostname to the tunnel
cloudflared tunnel route dns pihole-tunnel pihole.yourdomain.comThis will create the necessary CNAME in your Cloudflare zone.
- Install the tunnel as a system service (auto-start)
sudo cloudflared service install
sudo systemctl enable cloudflared
sudo systemctl start cloudflared- Verify
sudo systemctl status cloudflared
# then from anywhere:
curl -k https://pihole.yourdomain.com/admin/api.php
You should get a JSON response from Pi-hole confirming the change.
Troubleshooting checklist
-
cloudflaredservice status:sudo systemctl status cloudflared sudo journalctl -u cloudflared -f -
Confirm the credentials file exists:
ls ~/.cloudflared/*.json -
Confirm Pi-hole is reachable locally:
curl http://localhost/admin -I -
If using your domain, ensure the Cloudflare zone for
yourdomain.comis present in the same account you logged into. -
If you get 404 from the tunnel, check
~/.cloudflared/config.ymlingress rules and order (first match wins). -
If Pi-hole admin requires extra auth, use the API token for programmatic calls (UI login is separate).
Security note
- The above config exposes only the
/adminand/admin/api.phpendpoints via the tunnel. Keep your Pi-hole API token secret. If you want extra lock-down, put basic auth or IP allow rules in cloudflared ingress (or restrict with Cloudflare Access/Zero Trust).
🔹 Step 5: Run the Cloudflare config as system service (so it auto restarts at reboot)
Create the config file
Create a config file in /etc/cloudflared/ (that’s where the service expects it):
sudo mkdir -p /etc/cloudflared
sudo nano /etc/cloudflared/config.yml
Paste this (replace pihole.paradox-bd.com with your domain):
tunnel: e87bd965-4eba-41ea-82ee-d6ccf0efc936
credentials-file: /home/hasan/.cloudflared/e87bd965-4eba-41ea-82ee-d6ccf0efc936.json

ingress:
  - hostname: pihole.paradox-bd.com
    service: http://localhost:80
  - service: http_status:404
Save and exit (Ctrl+O, Enter, Ctrl+X).
Fix permissions
Make sure the system user cloudflared can read the credentials:
sudo chown -R cloudflared:cloudflared /etc/cloudflared
sudo chown -R cloudflared:cloudflared /home/hasan/.cloudflared
Install & enable the service
Now install the tunnel as a service:
sudo cloudflared service installThen enable & start it:
sudo systemctl enable cloudflared
sudo systemctl start cloudflared
Check status:
sudo systemctl status cloudflaredTest externally
From any other device (even outside your LAN), try:
curl -I https://pihole.paradox-bd.com/adminIf everything worked, you’ll see 200 OK or 302 Found (Pi-hole web login).
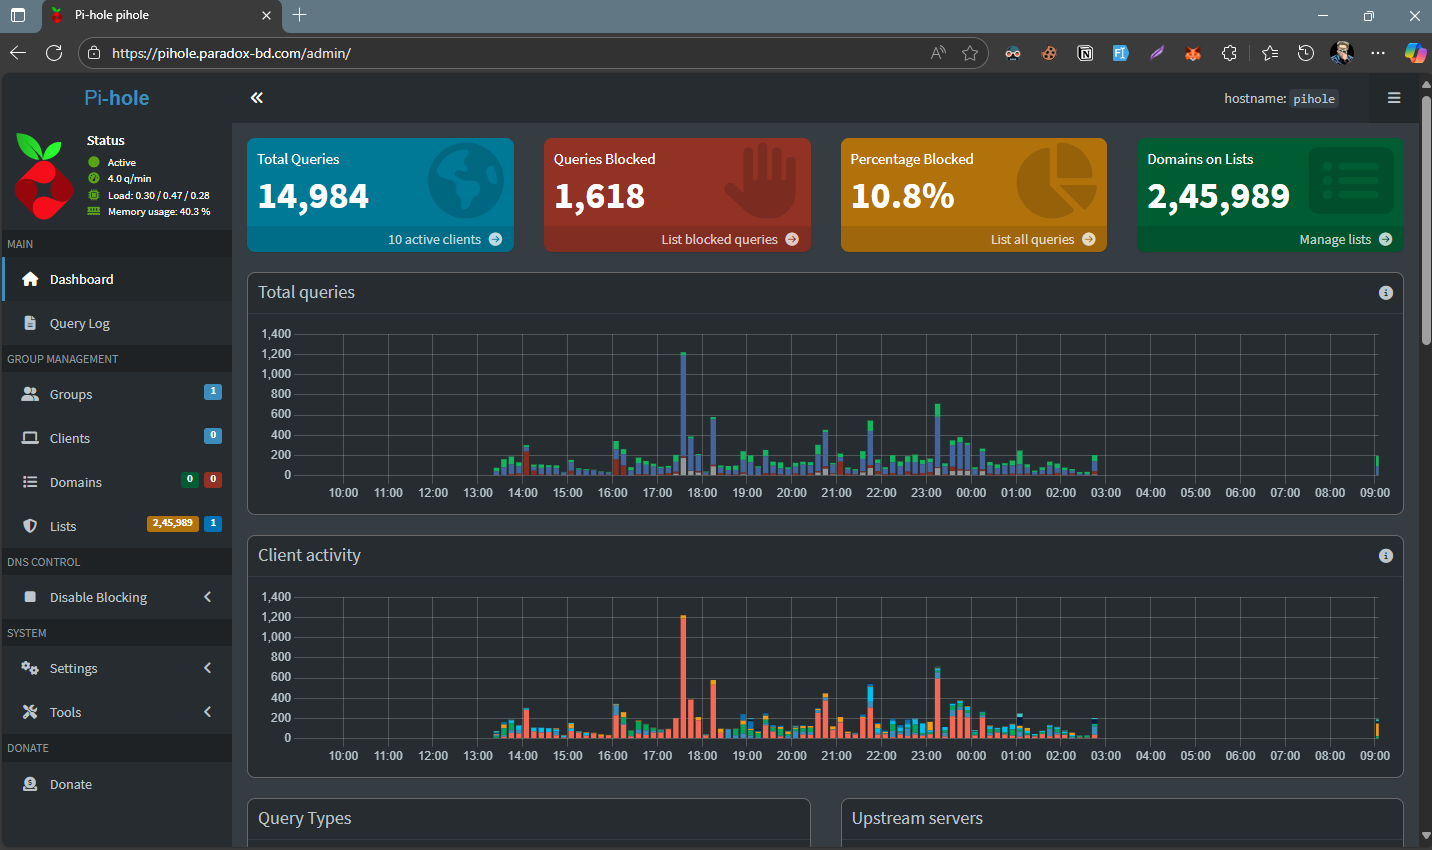
A sneak-peek of my dashboard (service might be unavailable if my pi is off)
https://pihole.paradox-bd.com/admin/
CC BY-NC 4.0 2025 © Dimitri POSTOLOV.RSS